Latest Products
Laptop screens show strange colors. What could be wrong?

Laptop screens show strange colors. What could be wrong?

Laptop screen started showing strange or wrong colors. What could be wrong? I’ve been asked this question many times and today I’m trying to solve this.
In this post I explain some basic troubleshooting techniques in case if your laptop screen started showing strange or incorrect colors.
You have to know how to disassemble the laptop in order to use following troubleshooting techniques.
TEST LAPTOP WITH EXTERNAL MONITOR.
The main step is testing how laptop outputs video on an external monitor (or TV).
You can connect your laptop to an external monitor using VGA cable, DVI cable, HDMI cable or S-Video cable, it depends on a type of connector you have on the laptop. Most laptops have VGA connector, so it would be the most common way to connect.
In my example I’m connecting to an external monitor via VGA connector.
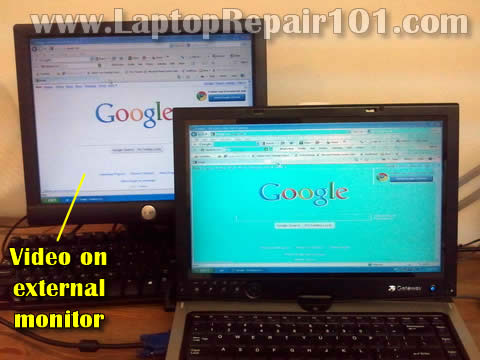
Some laptops detect external monitor automatically and start showing image on both screens right from startup.
Other laptops can detect the monitor but display image only on one screen (internal or external). In this case you’ll have to switch video between internal and external using the Fn key and one of the F* keys in the top row of the keyboard. This combination varies for different laptop brands, for example it’s Fn+F5 for Toshiba, Fn+F4 for HP, Fn+F8 for Dell, Fn+F7 Lenovo etc…
WHAT VIDEO ON EXTERNAL MONITOR CAN TELL?
If both, the internal screen and external monitor (or TV) show strange or incorrect colors or any other image distortion, this is the graphics card failure.
If only the laptop screen shows strange colors or any other distortion but external image appears to be normal (as in my example), the problem is somewhere inside the laptop display. It could be bad connection, bad LCD cable or bad LCD screen.
Let’s narrow down the problem one by one.
TRY RESEATING LCD CABLE CONNECTOR ON MOTHERBOARD.
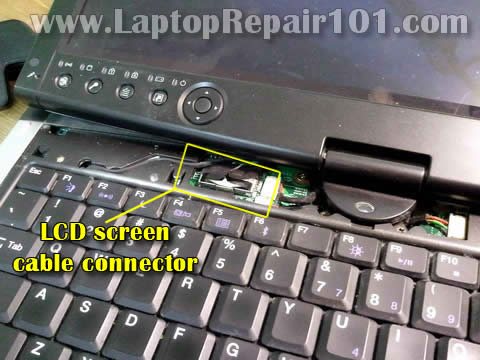
The laptop screen receives data signal from the motherboard via LCD cable. If the LCD cable not making good connection with the motherboard, it might cause image or color distortion on the screen. Try reseating the LCD cable connector and see if it fixes the problem. Make sure the LCD cable connector plugged correctly.
In most laptops the LCD cable connector located under the keyboard bezel (aka keyboard cover). If it’s not there, most likely you’ll find it somewhere under the keyboard.
WIGGLE THE LCD CABLE.
The LCD cable runs inside the laptop display, under the LCD screen. For this test it’s necessary to disassemble the display, so you can access the cable.
A pinched or damaged wire inside the LCD cable also can cause color distortion.
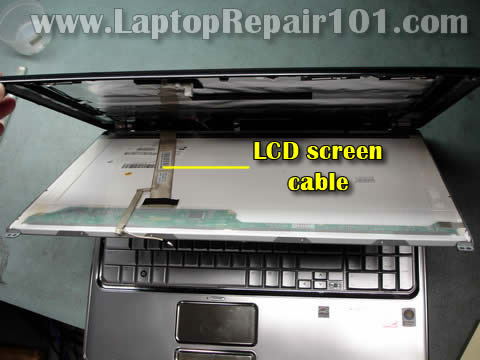
Try wiggling the LCD cable while the laptop is running. If wiggling the LCD cable affects image on the screen in any way (it starts shown different colors, lines, or image clears to normal, etc…) most likely the LCD cable is defective and has to be replaced. Try replacing the cable.
On the other hand, if wiggling the cable doesn’t affect image on the screen at all, most likely the cable is good and your problem related to the LCD screen failure. In this case you’ll have to replace the LCD screen.
APPLY SOME PRESSURE TO THE DISPLAY.
Try applying some reasonable pressure to the top part of the display assembly. Squeeze it with your fingers.
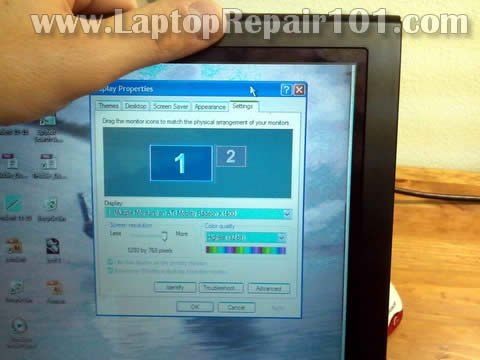
If the screen starts showing different colors, lines, or clears to normal when you squeeze the top part of the display panel, most likely this is LCD screen failure. In this case you’ll have to replace the LCD screen.
Source : Http://laptoprepair101.com

Laptop screen started showing strange or wrong colors. What could be wrong? I’ve been asked this question many times and today I’m trying to solve this.
In this post I explain some basic troubleshooting techniques in case if your laptop screen started showing strange or incorrect colors.
You have to know how to disassemble the laptop in order to use following troubleshooting techniques.
TEST LAPTOP WITH EXTERNAL MONITOR.
The main step is testing how laptop outputs video on an external monitor (or TV).
You can connect your laptop to an external monitor using VGA cable, DVI cable, HDMI cable or S-Video cable, it depends on a type of connector you have on the laptop. Most laptops have VGA connector, so it would be the most common way to connect.
In my example I’m connecting to an external monitor via VGA connector.
Some laptops detect external monitor automatically and start showing image on both screens right from startup.
Other laptops can detect the monitor but display image only on one screen (internal or external). In this case you’ll have to switch video between internal and external using the Fn key and one of the F* keys in the top row of the keyboard. This combination varies for different laptop brands, for example it’s Fn+F5 for Toshiba, Fn+F4 for HP, Fn+F8 for Dell, Fn+F7 Lenovo etc…
WHAT VIDEO ON EXTERNAL MONITOR CAN TELL?
If both, the internal screen and external monitor (or TV) show strange or incorrect colors or any other image distortion, this is the graphics card failure.
If only the laptop screen shows strange colors or any other distortion but external image appears to be normal (as in my example), the problem is somewhere inside the laptop display. It could be bad connection, bad LCD cable or bad LCD screen.
Let’s narrow down the problem one by one.
TRY RESEATING LCD CABLE CONNECTOR ON MOTHERBOARD.
The laptop screen receives data signal from the motherboard via LCD cable. If the LCD cable not making good connection with the motherboard, it might cause image or color distortion on the screen. Try reseating the LCD cable connector and see if it fixes the problem. Make sure the LCD cable connector plugged correctly.
In most laptops the LCD cable connector located under the keyboard bezel (aka keyboard cover). If it’s not there, most likely you’ll find it somewhere under the keyboard.
WIGGLE THE LCD CABLE.
The LCD cable runs inside the laptop display, under the LCD screen. For this test it’s necessary to disassemble the display, so you can access the cable.
A pinched or damaged wire inside the LCD cable also can cause color distortion.
Try wiggling the LCD cable while the laptop is running. If wiggling the LCD cable affects image on the screen in any way (it starts shown different colors, lines, or image clears to normal, etc…) most likely the LCD cable is defective and has to be replaced. Try replacing the cable.
On the other hand, if wiggling the cable doesn’t affect image on the screen at all, most likely the cable is good and your problem related to the LCD screen failure. In this case you’ll have to replace the LCD screen.
APPLY SOME PRESSURE TO THE DISPLAY.
Try applying some reasonable pressure to the top part of the display assembly. Squeeze it with your fingers.
If the screen starts showing different colors, lines, or clears to normal when you squeeze the top part of the display panel, most likely this is LCD screen failure. In this case you’ll have to replace the LCD screen.
Source : Http://laptoprepair101.com

Laptop screens show strange colors. What could be wrong?
View detail
How to repair dead Acer Aspire One notebook

How to repair dead Acer Aspire One notebook

Damage Indication :
After Acer Aspire is turned on by pressing the power button, the screen keeps black. But LED in the power button have green light. The laptop keeps black after that and cannot loading the windows

What happens ?
This condition is caused by Crash Bios Software in Acer Aspire.

How to repair?
1.       Prepare thumb drive  with 2 GB maximum size. Then format the thumb drive with FAT   partition
2.       Download file BIOS Aspire one in
3.       Extract the file and copy both file as : FLASHIT.exe and ZG51A32.FD directly to the thumb drive without folder / directory
4.       Plug the thumb drive on the USB port notebook
5.       Plug the adapter connector
6.       Press the Fn and esc button, hold down and after that press the power button
7.       After a few seconds, release the Fn and esc button. And than the power button will be blinking
8.       Press the power button once more, then the thumb drive will also blinking ( the file in the usb drive is accessed now). Lets it running
9.       Wait for few seconds, and the power stops blinking and then the laptop will go restart itself
10.   After restart, ACER ASPIRE ONE will turn on. This process takes time about 10 minutes.


Try this at your own risk...

How to repair dead Acer Aspire One notebook
View detail
How to test a laptop memory modules

How to test a laptop memory modules

A lot of laptop problems are caused by a failed memory or a failing memory module. As a laptop repair technician I test memory modules every time I get a laptop for repair. I have tried many different memory testing utilities but finally I stopped on Memtest 86+. So far it is one of the best free memory test utilities and I use it everyday. You can find this utility on the Memtest 86+ homepage.
To test your memory modules you have to do next:
  1. download Memtest 86+.
Choose Download – Pre-Compiled Bootable ISO (.zip) if you want to burn it on CD. Choose Download – Pre-Compiled package for Floppy (DOS – Win) if you want to place the utility on a floppy disk. I usually use CD because most computers have a CD drive and it’s much faster to start the test from a CD disc.
  1. Change the boot order on your computer to boot from a floppy drive or from a CD/DVD drive.
  2. Insert the floppy disk or the CD disc with Memtest 86+ into the computer.
  3. Start the computer.
If you did everything right, you computer will start from the floppy or the CD and the memory testing utility will start automatically.
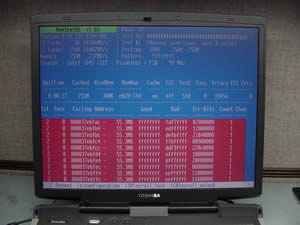
If your memory passed the test, you will not see any red error messages.
Laptop Memory Test Passed.

I usually allow a memory module pass the test 4-5 times. I’ve seen many times that a failing memory doesn’t fail the test on the firs pass and then fails on the second or third pass.
If your memory failed the test you will see red error messages.
Laptop Memory Test Failed.

How to test a laptop memory modules
View detail
How to test LCD screen inverter in a laptop

How to test LCD screen inverter in a laptop

In this post I explain how I test the LCD screen inverter board in a laptop computer.
The screen inverter failure is very similar to the backlight lamp failure. In both cases the screen gets very dark and the image on the screen becomes very faint, barely visible under a bright light.
If you suspect the inverter board failure, I know only one reliable way to test that. It’s either replacing the inverter board with a known good one and see if it works, or connecting a known good backlight lamp and see if your presumably bad inverter lights it up.
In most cases I go with the second method – testing the laptop with a known good backlight lamp. Why? Because backlight lamps are pretty much universal. The same backlight lamp will work with many different inverters as long as they have matching connectors. I’ll talk about these connectors later.
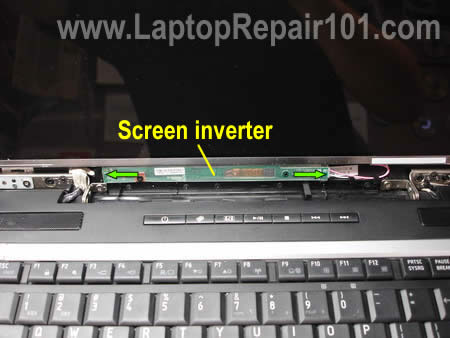
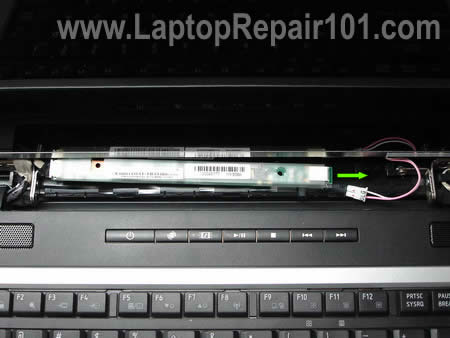
The inverter board is located inside the display panel under the LCD screen. In most laptops you can access the inverter board if you remove the LCD screen bezel. The inverter board has connectors on both ends. The left side of the inverter is connected to the LCD cable. The right side of the inverter is connected to the backlight lamp which is mounted inside the LCD screen. Check out this display diagram.
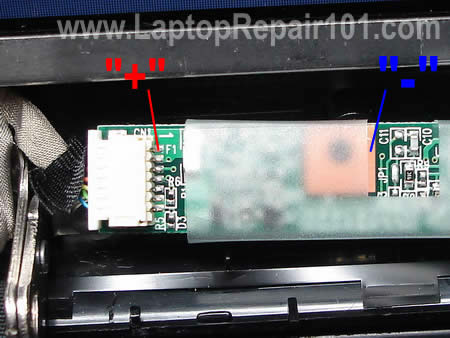
To make sure that inverter board is getting power from the motherboard (via the LCD cable), you can test it with a multimeter. In my case I connected the “+” lead of the multimeter to the pin 1 on the connector and the “-” lead to the ground trace around the screw hole. I got about 19.4V DC on that side of the inverter, so it’s getting power from the motherboard.
WARNING! If you accidentally short something on the inverter while testing it, you can damage the inverter or even the motherboard. Proceed on your own risk! Not sure? Don’t do that!
So, the inverter is getting power from the motherboard, but the screen is still dark. Apparently, it’s either bad inverter or failed backlight. Let’s test it with a known good backlight.
Here’s what I’m going to do:
1. I will unplug the LCD screen from the right side of the inverter. Basically, I’m unplugging the LCD backligth lamp which is located inside the screen.
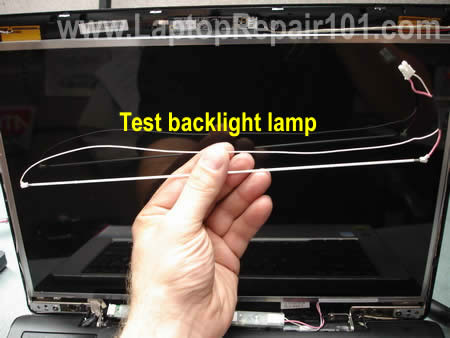
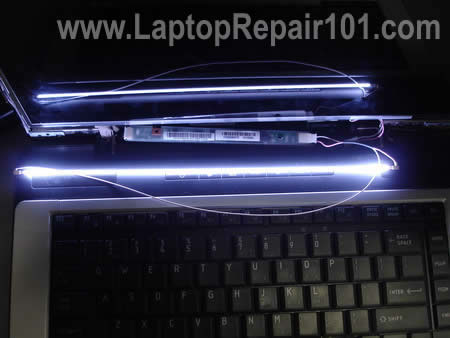
2. I will plug in my known good backlight lamp which you can see on the picture below. Please notice that my test backlight lamp is shorter than the screen, but for the test purpose that’s OK.
Results I’m expecting:
1. If my test backlight lights up, the backlight lamp inside the screen is bad and there is nothing wrong with the inverter board. If that’s the case, you’ll have to replace the LCD screen or replace the backligth lamp (which is not easy at all).
2. If my known good backlight lamp stays dark after I turn on the laptop, most likely we have a faulty inverter board. If that’s the case, you’ll have toreplace the inverter board and it’s relatively easy.
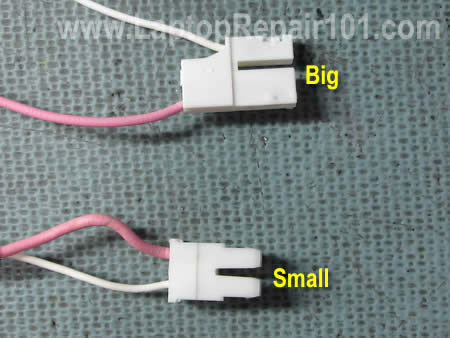
There are two different types of backlight connectors, you can see them on the picture below. The top one (big) is not as common as the bottom one (small). I do most of my test with a backligth lamp which has a small connector.
IMPORTANT! If you decide to buy a new backlight lamp for test, you have to make sure that the connector on the lamp matches the connector on the inverter. Very often backligth lamps are sold without any wires attached. If you plan to use this backlight as a test equipment, you’ll have to find one with wires as I have on the picture 3.
You can buy a cheap backlight lamp with wires here.
Finally, when you ready to test the laptop, unplug the LCD screen from the right side of the inverter.
Plug in your test backlight lamp and turn on the laptop.
In my case, the backlight lamp lights up, so the inverter board works properly.

How to test LCD screen inverter in a laptop
View detail
LCD Screen Turned Completely White

LCD Screen Turned Completely White

What can you do if the laptop LCD screen turned completely white? From my experience I can tell that this problem may be related to the following:
1. Loose connection between the video cable and the LCD screen.
2. Defective LCD screen.
3. Defective motherboard (I assume the graphics card is integrated into the motherboard).


Here’s an example of a laptop with white screen. When you turn on the laptop, it starts but the image on the screen is completely white right from the beginning. In my case it was a Toshiba Satellite M45 laptop but this problem may occur with any other brand.


Most likely you still can use the laptop with an external monitor. Just connect the monitor to the VGA port on the back or side of your laptop and then switch the video output from internal to external mode.
On Toshiba laptops you can toggle between internal and external screens using Fn+F5 keys. Hold down Fn and press on F5 until you get video on the external monitor.
On IBM laptops use Fn+F7.
On HP laptops use Fn+F4.
It’s possible that you have to use a different key combination on your laptop but you get the idea.
On some laptops, in order to be able to use the external monitor, you have to connect it to the laptop and then restart the laptop so
the external monitor is detected by the laptop.


I noticed that in some cases the laptop screen may turn white because of poor connection between the video cable and the LCD screen. If you want to check this connection, you’ll have to take apart the display panel because the connector is located on the back side of the LCD screen.
These laptop service manuals and disassembly instructions may be useful.


I always check the video cable connection first. Reconnecting the video cable may fix your problem.
If reconnecting the video cable doesn’t help, most likely you have a problem either with the LCD screen or with the motherboard.


The best way to find out witch one is causing the problem is testing the laptop with another working LCD screen. Without this test you’ll have to guess because as I mentioned before this could either bad motherboard or bad LCD screen.
You’ll have to disconnect the video cable from the LCD screen (connector 2) and the inverter board (connectors 3 and 1). After that you connect another working screen and test video.


For this purpose I’m using one of my test LCD screens. My test screen is cracked and because of that you see a wide white band in the center but it still works fine for this test.
The original screen is white but my test screen works normal (except the crack of course) and I can see the image. After this test I can tell that the problem must be related to the screen.


After I assembled everything back together and connected the original LCD, it’s still white.
CONCLUSION. In my case this problem is related to the LCD screen and it has to be replaced.

LCD Screen Turned Completely White
https://blogger.googleusercontent.com/img/b/R29vZ2xl/AVvXsEj8euDDnj7DlzJKEbfwXFcryJ3Q_ZPESEmICPJm-AhxbbyOgojH9LND8jwJeexUpoaC74YxLUsWPu4vAyW8eoC7n0cjx6r2bj_vtTMS4J7Pk8tMKD_P402CXYFhDSukmUGI1PzQVFySxFVe/s72-c/1-laptop-white-screen.jpg
View detail
Laptop runs very hot and turn off

Laptop runs very hot and turn off

My laptop runs very hot and eventually turns off or freezes – this is one of the most common complaints I have been receiving from my customer for many years. Why it’s happening? Is there an easy fix for that?
Most likely this problem is heat related. Take a look at the following picture.


Any laptop has a cooling module which consists of heatsink and cooling fan. When laptop is working, the processor (CPU) heats up and because of that the heatsink is getting hot too. At some temperature level, the fan kicks in and cools down the heatsink.
The problem starts when the laptop cooling module collects too much dust inside. Usually dust collects between the fan and heatsink. Dust clogs the heatsink and kills normal airflow inside the cooling module. Eventually, the processor gets very hot and the laptop turns off unexpectedly or freezes. This problem can be fixed by cleaning the laptop cooling module.
Cleaning laptop cooling module.
Some laptops give you an easy access to the heatsink and fan. In laptops like that you can access the cooling module through the bottom cover.


In my example I had to remove the cooling module. Otherwise, I wouldn’t be able to remove the fan and access the heatsink. In some laptops you can remove the fan without separating the heatsink from the CPU.
After I removed the fan, I found a thick layer of dust inside the heatsink. Cleaning the heatsink should fix any heat related problems.


Apply thermal paste on the processor.
If thermal paste on the processor dried out, you should replace it with fresh thermal paste.


Remove old thermal paste from the processor and heatsink using alcohol swab.
WARNING: In some laptops the heatsink also covers the graphics chip. The part of the heatsink which covers the graphics chip might have thermal pad on it instead of regular thermal paste. Do not replace thermal pad with thermal paste! Do not apply thermal paste on the thermal pad! Just leave thermal pad alone and apply thermal paste only on the processor.
I usually use Shin-Etsu thermal paste which is relatively cheap and performs well.


After applying new thermal paste, install the heatsink and fan back into the laptop. Do not forget to connect the fan cable to the motherboard!
What if cooling module cannot be accessed easily?
In some laptops the cooling module is buried deep inside the case and cannot be easily accessed and removed. In order to remove the cooling module it’s necessary to disassemble the whole laptop but it’s only for experienced users.
In laptops like that you can use the following technique:

Buy a can of computer compressed air.
1. Blow air into the fan grill on the bottom of the laptop.
2. Blow air into the grill on the side of the laptop.
Switch direction a few times until all dust is gone. Most likely this quick cleaning will fix your laptop overheating problem.

Source : Http://www.laptoprepair101.com

Laptop runs very hot and turn off
https://blogger.googleusercontent.com/img/b/R29vZ2xl/AVvXsEieGkoq-oeG-7NBWQUiNz5SKsvNhl4VHnUprYWAOJ8V0pg5r9W5-OGR9TwFSFnymhEqvLzUscN946qWPMInSVvMDLF0JO97KUj3uoVJR4Xj54Vg7KFUuKZhNGiYSW8e10KtozSMpYD7x34B/s72-c/clean-heatsink-cooling-fan-01.jpg
View detail
 
Support : Creating Website | Johny Template | Mas Template
Copyright © 2011. All Things About Laptop - All Rights Reserved
Template Created by Creating Website Published by Mas Template
Proudly powered by Blogger